

I still remember my first attempt at boxing in my apartment living room. Let’s just say a lamp paid the ultimate price for my enthusiasm. But guess what? Couple of years later, I can tell you that starting boxing at home isn’t just possible – it can be an incredible journey. Whether you can’t make it to the gym, prefer working out alone, or just want to try something new, I’m going to show you exactly how to start boxing at home the right way.
The real magic happens when you feel that first perfect punch, when a combination finally clicks, or when you realize you’re standing taller and feeling more confident than ever before.
The Real Deal on Home Boxing Equipment
Let me save you from the mistakes I made when I started. You don’t need a professional setup or fancy equipment. Trust me – I’ve taught people who transformed their boxing skills using nothing more than their living room and a few basic tools.
For space, you need at least 6×6 feet of clear area. Just make sure your space has a non-slip surface. (Remember that lamp I mentioned? Yeah, slippery floors were involved.)
The Boxing Stance: Your Foundation
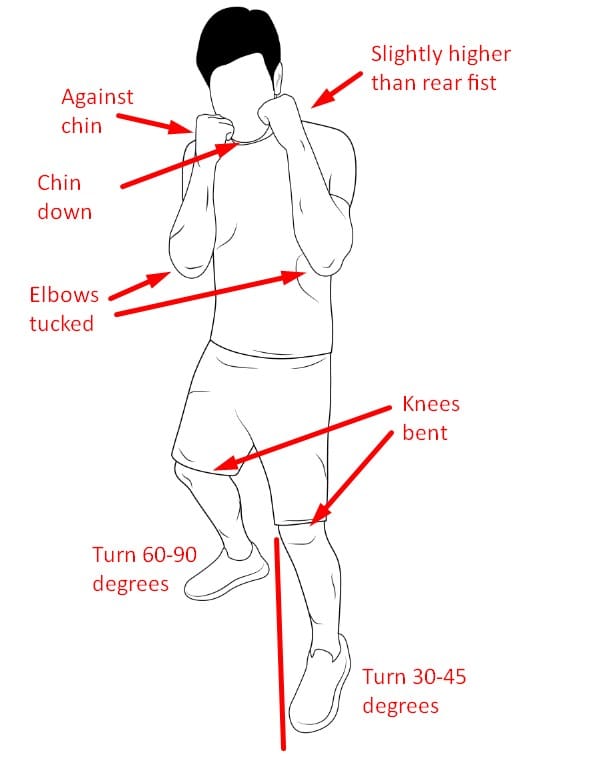
Alright, this is where it gets good. Your boxing stance isn’t just a position – it’s your launchpad for everything.
Plant those feet shoulder-width apart, dominant foot back at a 45-degree angle. Here’s my favorite cue: imagine you’re standing on a clock face, with 12 o’clock straight ahead. Your front foot should point to 12, and your back foot to about 4:30 (if you’re right-handed) or 7:30 (if you’re left-handed).
Now, here’s something that changed my whole game: think of your stance as a loaded spring. Keep about 60% of your weight on your front foot and 40% on your back foot. Your knees should be slightly bent – not squatting down like you’re waiting for the bathroom, just relaxed and ready to move.
Keep your elbows tucked to your ribs, and keep your fists at cheek level. Try to imagine holding a sandwich under your chin – don’t let it drop.
The Four Basic Punches
No exaggeration – mastering these four punches will transform your boxing. Each one has its own personality.
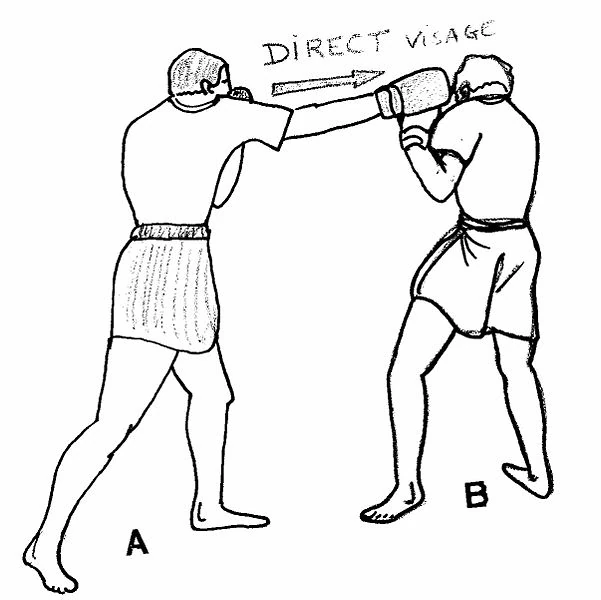
The jab is your best friend – it’s quick, sharp, and sets up everything else. Think of it like knocking on a door before you bring the house down. It’s your lead hand shooting straight out and snapping right back. It should be like a snake strike – your opponent shouldn’t see it coming or going.
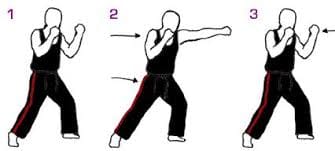
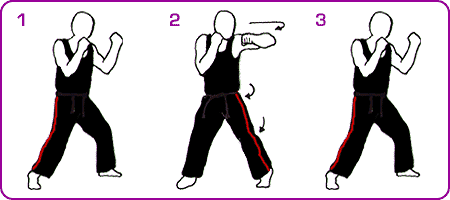
The cross is your power punch, thrown with your rear hand. Here’s where most people go wrong (including me when I started) – they try to arm punch. The real power comes from your hips! Turn them like you’re trying to show someone behind you your back pocket. The first time you get this right, you’ll feel like you’ve discovered a superpower.
The hook is where things get interesting. Keep your elbow at 90 degrees. The power comes from pivoting your foot and turning your hip, not from swinging your arm like you’re trying to win a baseball game.
The uppercut is your secret weapon, especially for home training. It’s perfect for building core strength and understanding body mechanics. Think about scooping ice cream and lifting it to someone’s chin (minus the cherry on top).
A Boxing Workout That Actually Works
I’ve tested this workout many times, tweaking it until it’s perfect for home training. It’s challenging but scalable, and most importantly, it works. This is one of my favorite routines to use when I can’t make it to the gym.
The All-In-One Home Boxing Workout
Start with a proper warm-up – 10 minutes that will save you from injury and set you up for success:
- 5 minutes of jump rope or high knees (remember, we’re warming up, not trying to win the Olympics)
- 1 minute of arm circles (forward and back – your shoulders should feel toasty)
- 1 minute of dynamic stretches (arm swings, torso twists, leg swings)
- 3 minutes of light shadow boxing (easy pace, focus on form)
Now for the main event – 20 minutes of technical work broken into four 5-minute rounds:
Round 1 – Single Punches
Each minute focuses on a different punch. Take your time, feel the movement, make each one count:
- Minute 1: Just jabs (mix in some steps forward and back)
- Minute 2: Crosses only (don’t forget about hip rotation!)
- Minute 3: Hooks (keep that arm level)
- Minute 4: Uppercuts (tight and controlled)
- Minute 5: Your choice – whatever punch feels best
Round 2 – Basic Combinations
This is where the magic happens:
- Minute 1: Jab-Cross (1-2)
- Minute 2: Jab-Cross-Hook (1-2-3)
- Minute 3: Double jab-Cross (1-1-2)
- Minute 4: Jab-Cross-Hook-Cross (1-2-3-2)
- Minute 5: Mix them all up!
Round 3 – Movement Combinations
Now we’re cooking:
- Minute 1: Jab-Cross while stepping forward
- Minute 2: Jab-Cross while stepping back
- Minute 3: Hook-Cross while pivoting left
- Minute 4: Jab-Cross-Hook while pivoting right
- Minute 5: Free movement with your favorite combinations
Round 4 – The Power Round
This is where champions are made:
- 30 seconds: Fast jabs
- 30 seconds: Powerful crosses
- 30 seconds: Lead hooks
- 30 seconds: Rear hooks
- 30 seconds: Uppercuts
- 30 seconds: Jab-Cross-Hook-Cross
- 30 seconds: All out combinations
- 30 seconds: Shadow boxing recovery
Finish strong with 10 minutes of conditioning:
45 seconds work, 15 seconds rest for each:
- Plyometric push-ups (builds punching power)
- Mountain climbers (develops core rotation)
- Explosive squats (optionally with weights)
- Plank shoulder taps
- Dumbbell snatches
- Shadowboxing with dumbbells
- Squat jumps
Cool down for 2 minutes:
- Light shadow boxing (1 minute)
- Static stretches (1 minute)
Making This Work for You
Look, I get it – this might seem like a lot. But here’s the thing: every single fighter started exactly where you are now. Some couldn’t throw a proper punch, others couldn’t jump rope for 30 seconds. Now? They’re absolute machines.
If you’re just starting out:
- Take longer breaks between rounds
- Focus on form over speed (always!)
- Cut the conditioning exercises to 30/30 splits
- Drop a round if you need to
- Do shorter workouts until you get used to it
Ready for more challenge?
- Add an extra minute to each round
- Increase your speed while keeping perfect form
- Add defensive movements (slips, ducks, weaves)
The key is to listen to your body while pushing your limits. Some days you’ll feel like Muhammad Ali, others like you’re just learning. That’s completely normal! What matters is showing up and putting in the work.
Conclusion: Your Boxing Journey Starts Now
I’ve shared everything you need to know about starting boxing at home. The rest is up to you. Start slow, focus on form, and most importantly, enjoy the process! There’s something magical about throwing that first perfect punch or nailing a combination you’ve been practicing.
Remember what I always tell my students: every great boxer started exactly where you are now. The only difference? They kept showing up, kept practicing, and never lost their enthusiasm for learning.
Ready to begin? Your new workout space is waiting for you, and now you know exactly what to do in it. Wrap those hands, get in your stance, and let’s make it happen!
Got questions as you get started? Drop them in the comments below or check out more content at Punch Hive – helping people fall in love with boxing is literally my favorite thing. Now get out there and start throwing some punches – your boxing journey begins today!
Hi, this is a comment.
To get started with moderating, editing, and deleting comments, please visit the Comments screen in the dashboard.
Commenter avatars come from Gravatar.
Pingback: 15-Minute Boxing Workout at Home to Build Strength and Endurance
Pingback: How to Wrap Your Hands for Boxing in 9 Easy Steps